Technical Details
If you are experiencing any difficulties please check you are using the correct settings outlined below.
Webmail
To access your webmail please go to https://webmail.emailsrvr.com or http://webmail."yourdomain.com".
Enter your email address and password.
Email application on your computer, smartphone or tablet
User Settings
Account name: [email protected] (your full email address)
Password: Used to access your webmail
Server Settings
All email accounts we host, regardless of the domain name use the following server settings. To use a secure connection, use the settings marked "SSL."
Incoming mail: secure.emailsrvr.com (IMAP)
Port: 993
SSL
Authenticated
Incoming mail: secure.emailsrvr.com (POP)
Port: 995
SSL
Authenticated
Outgoing mail: secure.emailsrvr.com (SMTP)
Port: 465
SSL
Authenticated (password)
For Step by step instructions on setting up your email on your computer or smart phone use the tabs below.
Mac Mail
Set Up IMAP - Mac® Mail
If you would like to learn more about the differences between POP and IMAP, please see IMAP or POP
To set up Mac Mail for IMAP, perform the following steps:
Incoming Mail Server
1. Open Mac Mail. If this is the first time that it has been used, the Setup Assistant will appear. Otherwise, select File / Add Account.
Full Name—Enter your first and last name. This is the name that will appear in the From field of messages you send.Email Address—Enter your entire email address (e.g., [email protected]).
Password—Enter the password for your email account.
2. Click the Continue button. Mac Mail will now attempt to detect the server settings.
3. Enter the following information:
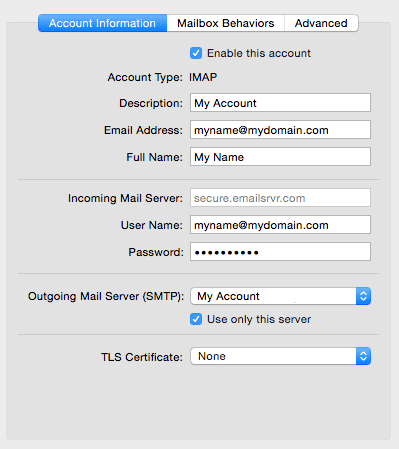
Account Type—Select IMAP from the drop-down menu.
Description—Enter a descriptive name for your mail account (e.g., Work Mail or Home Mail).
Incoming Mail Server—Enter the secure server name: secure.emailsrvr.com
User Name—Enter your entire email address (e.g., [email protected]).
Password—Enter the password for this account.
 Continue button.
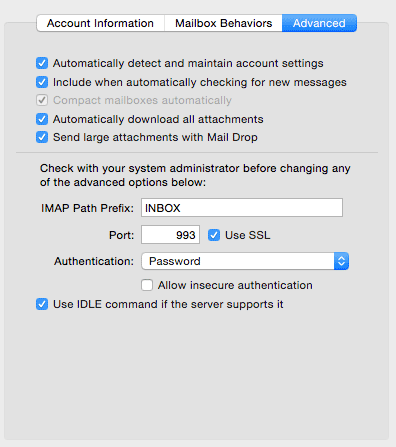
Check the Use Secure Sockets Layer (SSL) box in the Advanced Tab
In the Authentication drop-down menu, select Password.
5. Click the Continue button.
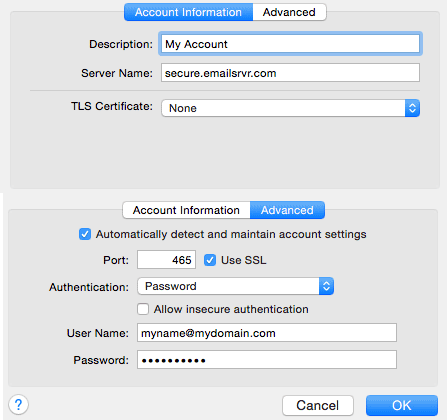
 secure.emailsrvr.com
Check the Use only this server box.
Check the Use Authentication box.
User Name—Enter your entire email address (e.g., [email protected]).
2. Click the Continue button. Mac Mail will now attempt to detect the outgoing server settings. If the Outgoing Mail Security window appears, do the following:
Check the Use Secure Sockets Layer (SSL) box.
In the Authentication drop-down menu, select Password.
3. Click the Continue button.
When the setup process is done, you will see an Account Summary window that summarizes your connections. Click the Create button.
 Mail / Preferences.
Click the Accounts button, located at the top of the window.
Click once on your IMAP account, as it appears in the Accounts list.
Click the Mailbox Behaviors tab.
Clear all of the check boxes.
Close the Accounts window.
When prompted to save your changes, click the Save button.
In your IMAP folder, located in the Mailboxes pane (select View / Show Mailboxes to display the pane if it’s not there), do the following:
Click once on the Sent, Drafts, Spam, or Trash folder.
Select Mailbox / Use This Mailbox For.
Select Sent, Drafts, Junk, or Trash from the resulting list in the sub-menu.
The selected folder will disappear from your IMAP list, and will now reappear as the corresponding Mac Mail folder.
Outlook
Set Up IMAP - Outlook® 2010
If you would like to learn more about the differences between POP and IMAP, please see POP or IMAP
For increased security, we recommend that you use our secure (SSL) servers, as detailed below.
To set up Outlook 2010 for IMAP, perform the following steps:
In Outlook, click the File tab.
Click the Account Settings button, and select Acount Settings.
Click the New button.
Click the Manually configure server settings or additional server types option button.
Click the Next button.
Ensure that the Internet E-mail option button is selected, and click the Next button.
Enter the following information:
Your Name—Enter your first and last name. This is the name that will appear in the From field of messages you send.
E-mail Address—Enter your entire email address (e.g., [email protected]).
Account Type—Select IMAP from the drop-down menu.
Incoming mail server—Enter the secure server name:
secure.emailsrvr.com
Outgoing mail server (SMTP)—Enter the secure server name:
secure.emailsrvr.com
User Name—Enter your entire email address (e.g., [email protected]).
Password—Enter the password for your email account.

Click the More Settings button.
Click the Outgoing Server tab.
Select the My outgoing server (SMTP) requires authentication check box. Leave the default setting, Use same settings as my incoming mail server.

Click the Advanced tab.

In both of the Use the following type of encrypted connection drop-down menus, select SSL.
In the Incoming server (IMAP) box, enter the secure incoming port: 993
In the Outgoing server (SMTP) box, enter the secure outgoing port: 465.
Click the OK button.
Click the Next button.
Click the Finish button.
Click the Close button.
IMAP Folders
Folders should sync automatically with an IMAP account; however, if you have added folders in Webmail and they are not showing in Outlook, perform the following steps:
Right-click the account name in the folder list panel.
Select IMAP Folders.
Click the Query button.
Select the newly added folder(s), and click the Subscribe button.
Click the OK button.
Restart Outlook to update the folder list.
IPhone/iPad
Set Up IMAP - iPhone™, iPad™, iPod®
To set up IMAP, do the following:
Tap Settings.
Tap Mail, Contacts, Calendars.
Tap Add Account.
Tap Other.
Tap Add Mail Account.
Enter the following information in the spaces provided:
Name—Enter your first and last name. This is the name that will appear in theFrom field of messages you send.
Address—Enter your entire email address (e.g., [email protected]).
Password—Enter the password for your email account.
Description—Enter a descriptive name for the account (e.g., Work Account). This description will be visible only to you.
Tap the Save button.
If IMAP is not already selected, tap the IMAP button.
Under both the Incoming Mail Server and Outgoing Mail Server sections, enter the following information:
Host Name—Enter the secure server name: secure.emailsrvr.com
User Name—Enter your entire email address (e.g. [email protected]).
Password—Enter the password for your email account.
Tap the Save button.
The device will verify settings and return to the Mail, Contacts, Calendars screen.
Configure Default Folders
Tap Settings.
Tap Mail, Contacts, Calendars.
Tap the IMAP account.
Tap Advanced.
Under Mailbox Behaviors, tap Drafts Mailbox.
Under On the Server, tap Drafts.
Tap Advanced.
Tap Sent Mailbox.
Under On the Server, tap Sent.
Tap Advanced.
Tap Deleted Mailbox.
Under On the Server, tap Trash
